Sunday, April 17, 2011

Regency Walking Party

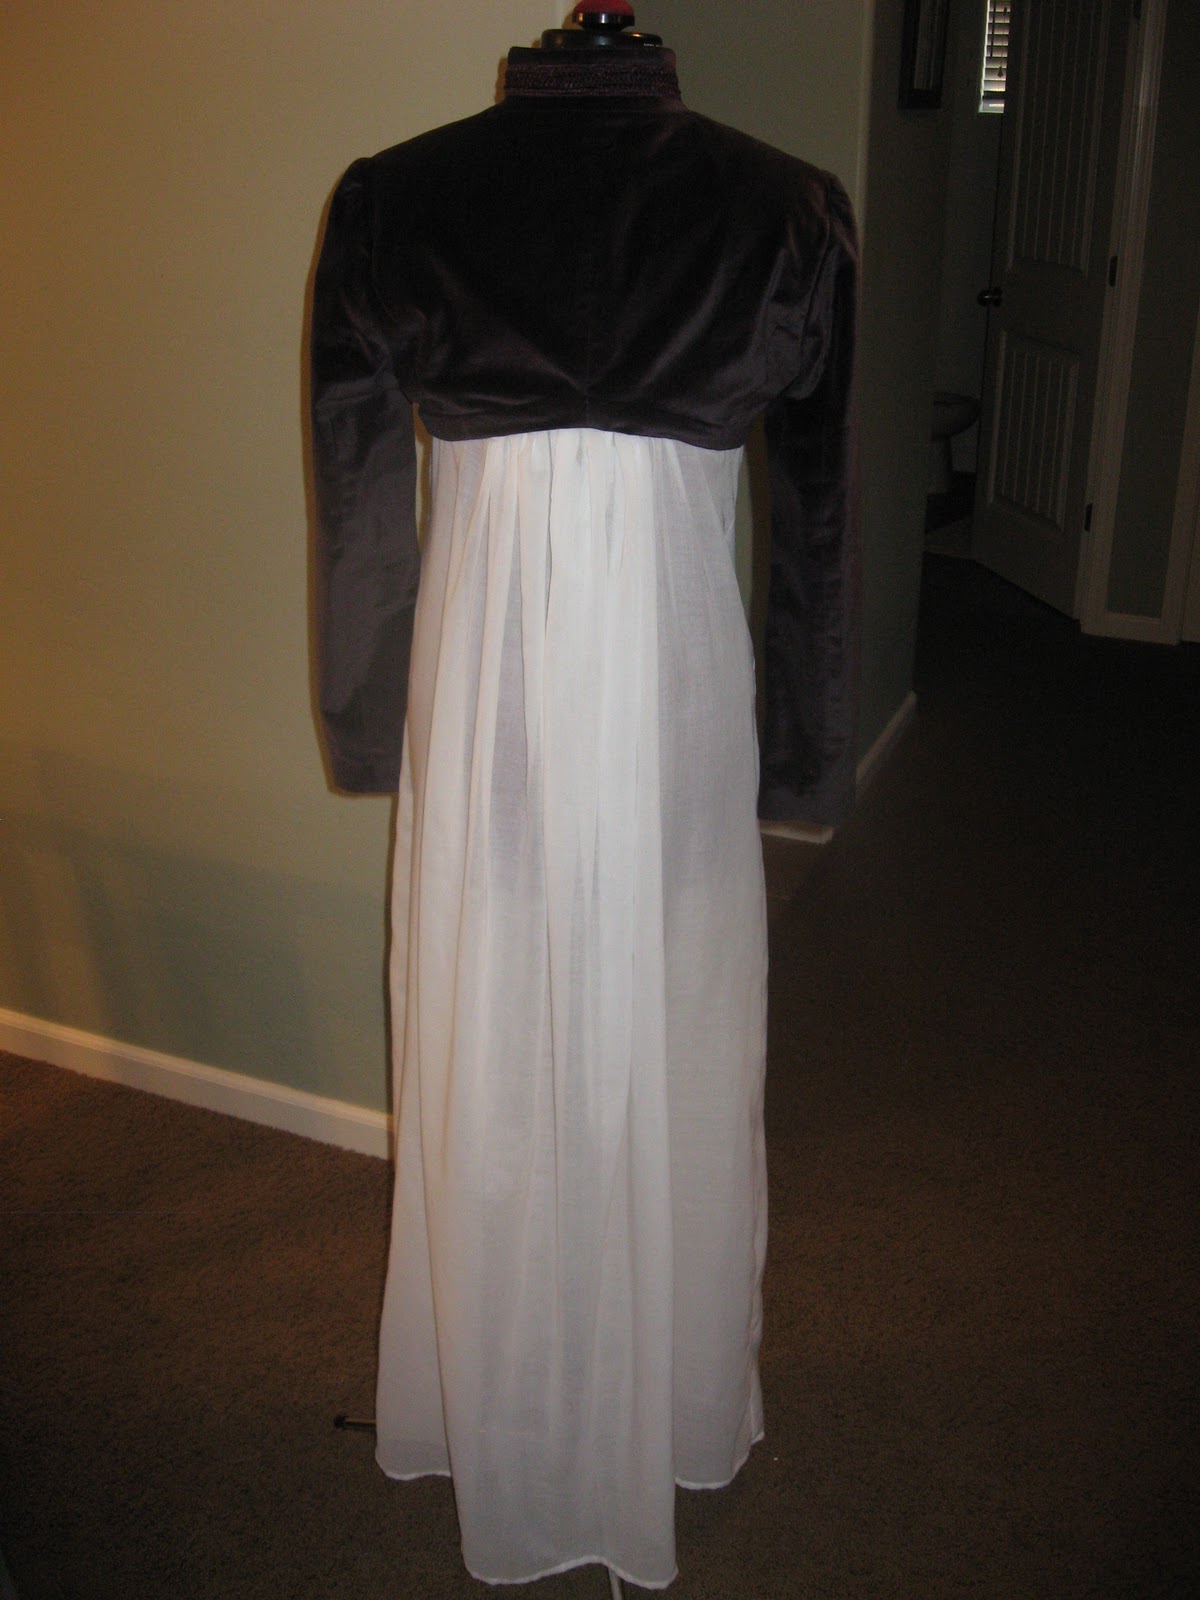
I finally had an occasion to wear my new Regency dress and purple Thrift Store Spencer (though it quickly became too warm for that).  As you can see above, the curve of the back actually turned out nicely. I was having loads of issues getting it to lay flat when pinning it, so I am pleased with this result. It think it shows off my bustle beautifully.


There are a lot of things I wish I had done differently with this dress even though I am still happy I made it. One thing is, the dress turned out way too short. I can't understand how that happened since my Regency Dress 1.0 was extremely long and I used the same pattern. Oh well... the shortness actually came in handy for the walking party, since the other girls were either dragging their hems through the mud, or eventually became tired of holding up their gowns.

The table spread reminded me of the Mad Hatter's tea party.

Another thing I messed up was that the bust of the dress was too high. It kept riding up and slicing my boobs a bit. Heather says if I have the right foundation garments this might solve the problem. Also, Jennifer gave me some pointers of how to modify my bodiced petticoat slightly to push my boobs together more. So, hopefully I can make this dress work.. eventually.

Fun picnicking blankets!

The picnic was so much fun, as we had a lot of food to share and loads of wonderful conversation. I can't wait to have another event like this! There were many beautiful dresses to look at and many looky-loos wandering our way. Hopefully PERC Fresno will grow over time with more period costume fans in attendance. 

The whole group in assembly at the Japanese Gardens in Fresno.

More pretty costumes!

Thursday, April 14, 2011

1940s Shirt Dress Mockup

I've been working on my 1940s shirt dress muslin designed from a Hollywood Pattern and here's what I have so far: 


I keep forgetting to clean my mirror before I take the pics. Oh well, I just wanted to post SOMETHING since I've been MIA from the sewing world for a month now.

The muslin is obviously not made of muslin. It's a green Rayon fabric that is so clingy it is currently circling around in my dryer with a buttload of dryer sheets. My main goal of making the muslin is to learn to decipher vintage pattern directions as well as see if this pattern even fits me. The package measurements as stated are only slightly off: Bust is 1.5 inches larger and Hip is one inch larger. Therefore I figured I'd just make the muslin without any alterations and see what's what. 

I ended up actually folding the facing on the bodice wrong and inadvertently shaved off about and inch from the width of it. It seems okay, though it may have made the collar opening too risque.  What do you think?

Also, I know I SHOULD make all those thousands of buttonholes as practice, but that would require me to go buy some interfacing, and I don't really feel like it right now.  Hey.... question... would you completely laugh at me if I didn't do bound buttonholes on this? The dress is for a play (where you as an audience member would be about 5-15 feet away from me at any given time)... and I don't want anyone laughing out loud at my buttonholes and saying "wait... this IS 1941, right?"  That would be embarrassing.

Also, I have no idea how much to hem off the skirt. Unhemmed, it hangs about 3 inches lower than my knee.

BTW, I'll be at a Regency Event this weekend so I'll finally have some Regency dress and Spencer photos to share! 

Here's a little preview with myself and Jennifer Rosbrugh from Historicalsewing.com whose name is actually pronounced Rosebrook.. go figure:


Thursday, March 10, 2011

The Benefits of being a Benefit Fan!

It's crazy how just thinking certain thoughts makes them come true! I was just thinking about how I'm running out of makeup and wish I had the cash to buy a Benefit foundation playstick, when POOF!!! ...
Am I lucky OR WHAT?
...I get a package in the mail from Benefit asking me to try out their new skincare line... for FREE! Imagine my surprise! It's like Christmas!
My current Benefit Cosmetics collection
The thing I love the most about Benefit is their beautiful packaging! I smile whenever I open the blush boxes. These So Radiant products are even more fun than the blushes. The glass bottles with the cork tops make me feel like I'm at a spa!
Honestly perfect packaging. I am reeling with excitement!
I've been feeling pretty down about my skin lately as my acne has once again flared to extreme levels (see unmasked pic below). I think this free package couldn't have arrived at a better time, as I definitely need to do something different with my skin. So, I'll keep you updated and let you know how this new routine goes:

I was SO excited about getting the package that I tried out the new So Radiant skincare line a few hours later in preparation for attending my very first Rogue Festival show!

1) First I cleansed my face with Clean and Clear's sensitive foaming face wash.

2) Then I used Benefit's Triple Performing Facial Emulsion.  It's basically a very light exfoliator, similar to one I use from Sephora, with Benefit's brand you get 3 times more.  I love the scrubbies! This product leaves skin feeling clean without any stickiness. Also, something that was surprising to me, is that after scrubbing my face, my zits were actually less red and less noticeable (See below). Go figure! Maybe the pore-reducing claims are true, after all.
EEk!  My terrible un-makeuped face. Gag.
3) Next was the Triple Performing Facial Emulsion.  I love, love, love this! This moisterizer leaves a sweet, clean feeling on my skin. It is not heavy at all even though it has a 15 SPF. I can't wait to see how it wears throughout the day.

4) Lastly, I put on the It's Potent Eye Cream.  I have this pet peeve. People at work keep saying I look tired, which bothers me because I'm actually NOT tired.  This is their hint to me that I look bad, I guess. Well, this So Radiant eye cream definitely brightened my under-eye circles. I will be at a wedding tomorrow, so I won't be able to try the at-work "tired test" until Monday. We'll see how they react.

5) To top it off, I covered my zits with my Erase Paste which I absolutely SWEAR BY whenever I get these horrid breakouts. It works wonders on hiding the red spots and scars, specially when I use That Girl Primer underneath.  I truly miss my Play Stick which meshes so perfectly with my primer but I can't afford to buy a new one just yet.   So, in keeping with my Benefit theme for tonight's outing, I topped everything off with my Hello Flawless Powder coverup which, to tell you the truth, I'm really not a fan of.  HF just doesn't seem to cover evenly for me; It gets blotchy on my skin, possibly because I try to cover more around my breakouts.  I just truly prefer liquid/stick foundations over powder. Ugh, I miss my Play Stick!!! Maybe someone will give me a giftcard for my July birthday? Hmm?


6) I also added my secret weapon, High Beam on my cheeks and below my eyebrows.

Another attractive shot.

7) I put on a little lipstick and my favorite mascara in the world, Bad gal Plum which gets me at least one complement a week for bringing out my blue eyes.


So, all Benefitted out (and with my 50's black taffeta skirt on)... how do you think I look?


Thursday, March 3, 2011

A pain in the you-know-what.

I am sick of cutting things out for my 1940s Shirt Dress. Perhaps it is a result of the small, dull scissors (the only ones I own), or perhaps it is the fact my the fabric is rayon, or maybe it is a result of the 26 pieces involved in this 1940s pattern, but I am sick of it and am taking a break by watching Bleak House.  /End Rant.
I still have six more pieces to go. Ugh.

Here's a blurry pic of the insanity that I must cut out... not a single one gets to be double-layered.


Monday, February 28, 2011

Planning my 1941 Shirt Dress

I've skipped my 1920s dress for now, since I realized I didn't buy enough black fabric for the slip.  Oops! 

Oh well, that actually makes me happy because it means I get to start thinking about my 1940s dress that I will get to wear in a play in June! I will be making a dress from this Hollywood 1387 Pattern:

1940s shirt dress
I will be making the long-sleeved version on the right.

I will also be attempting to make this Vintage Vogue 7464 hat:

I've heard the hat is virtually impossible to make due to the fact that the envelope's instructions are unclear AND there is no picture of the back included in the pattern. The good news is there are other hats included in the pattern that are easier to make. So, I have a backup plan. BTW, I have no idea what color hat fabric to buy to match the final brown pinstripe dress fabric below.

I will be making a muslin first out of this pretty green rayon fabric because I just couldn't resist the color, and at $2 a yard, I figured I could deal with the transparency of it.. it IS just a mock-up after all.  I decided to make a full-scale muslin because the perfection of this dress is absolutely important to me, and since I have never sewn a real vintage dress before, I figured I'd better practice first.
I can't tell you how much I love this color.

The final dress will actually be made out of this lightweight pinstriped wool: 
It's got a little blue pinstripe!

And yes, I do know that the muslin will hang differently because of the difference in fabrics, but like I said... I just couldn't resist the gorgeous green, and since I'm in a funk lately and need some cheering up, WHAT I SAY GOES!  :-)

So, my first problem in sewing this gown is the craziness of unmarked vintage patterns.  What's with all these holes?!!!  Ugh. I've got a lot of learning to do, so I've been pouring over all the unmarked pattern tip pages like this and this.

The first thing I need to do is trace all the pattern pieces onto sturdier paper. I've read that this will help me since I will be able to write all over the pieces.  Works for me.

I'm tracing the itty bitty pieces first.

Also, I've been researching everything about the 1940s including these 1941 Sears Catalog pictures below which are VERY similar to my gown!


FYI, I am STILL looking for a pretty pink satin bra like the one below, however, we all know how that went last time, so I'm feeling a little discouraged. I guess if all else fails, I can get one of the WhatKatieDid Harlow bullet bras, though I don't like them nearly as much.  So... if you see one, let me know!!


Saturday, February 26, 2011

How to make a thrift store Regency Spencer: Part 4

I finished my Spencer! I'm pretty pleased with it, and hope to post pics of my entire Regency ensemble someday.  Here's what the finished dress looks like:


Now, back to the tutorial:

1) After rolling the waistband to the thickness you want it (mine was only an inch, since I didn't have more usable fabric to work with), handsew the hooks where you want them. This will keep the coat closed and close to your body.

2) Handsew or machine stitch waistband to the inside of the coat.  Try to be even, though I don't always have much success with that.  I handsewed mine... while watching 4 hours of Jane Eyre!

2) Check the fit to see if there's any wierdness going on.  

This pic was taken with some pins still in it, so it's still a little bulgey,
and I might need to add another hook to close up that little gap in the front.

  3) Then, take a long car ride to Tulare (45 minutes away) while handsewing the lining in place.  


4) Then you're done! Try it all on!

My waistband doesn't seem to curve up as high in the back as I wanted, but I think it still shows off my train nicely. 


By the way, I finally figured out that pesky buttonholer!  I had to go to the school I work at to get the sewing teacher to help me. My machine's buttonholer doesn't seem to want to work on this thin fabric.
Practice makes perfect!
Here's the button design I planned on using, however, I think it sticks out too far with my Spencer over it. So, I might cover my own buttons.  However, I'm actually feeling a bit upset about my Regency attire right now, since the event I planned on wearing it to was cancelled. So I might not come back to this for awhile.

Edit: The dress and Spencer are done!  See the completed product here.

Wednesday, February 23, 2011

How to make a thrift store Regency Spencer: Part 3

Welcome to Dr. Frankenstein's Laboratory.
This has been the biggest piecing together of scrap material since the patchwork skirts of the 40s.
Sewing can be frustrating sometimes. Sometimes I'm not really appreciative of the lessons I've learned while sewing. Today's lesson was that velvet apparently has a top and a bottom. If you turn a piece around – because you need to use a scrap as efficiently as possible – it will look like the photo below where both middle pieces of the waistband are a helluva lot darker than the rest of the coat. I realized this AFTER I had sewed it down, of course. I undid the whole thing and then sewed it wrong AGAIN.  Six hours later, I've posted here what I've learned.

1) After pinning down the band (making sure to check that the velvet or grain of fabric is running the same way thoughout), sew the top of the waistband with right sides together.


2) Flip the waistband down and then check how much you want to hem the piece. I wanted my waistband to be 1 inch wide (mostly out of necessity since the pockets the coat previously had inhibited the amount of fabric I could get).

3) Trim the excess material underneath the waistband.


4) Pin the waistband to the width you want.

5) Go ahead and cut off the miles of lining now, leaving about an inch to hem nicely inside the spencer!  :-)     (Thank God)


6) Check out the pinning job.  I will need to mess with the evenness of the width, but I'm too tired right now.

Da' Front.

Der bach.  ZZzzzZZZzzzzz.
My entire dining room now has overdosed on velvet pills which cover every usable and non-usable surface:

In fact, the pills also now cover ME. Tonight, I will dream of ants crawling all over me.


Dr. Frankenstein – OUT –.