Wednesday, August 2, 2017

Part 3: Rey's Resistance Bag (Rucksack)


I cannot recommend enough the amazing tutorial that EmeraldB has put together in creating Rey’s Rucksack. Please check it out as it served as my starting point for this project!


Fabric:


Costs:

$14.99 ** 1 - Enfield Rifle Sling in Olive Drab Green from Amazon
$21.99 ** 1 - Olive Drab Top Load Duffle Bag from my local Army surplus store.

First I washed and dried the green duffle bag which helped fade the dark green dye and also resulted in some nice faded lines from the wrinkles in the bag rolling around in my washing machine.

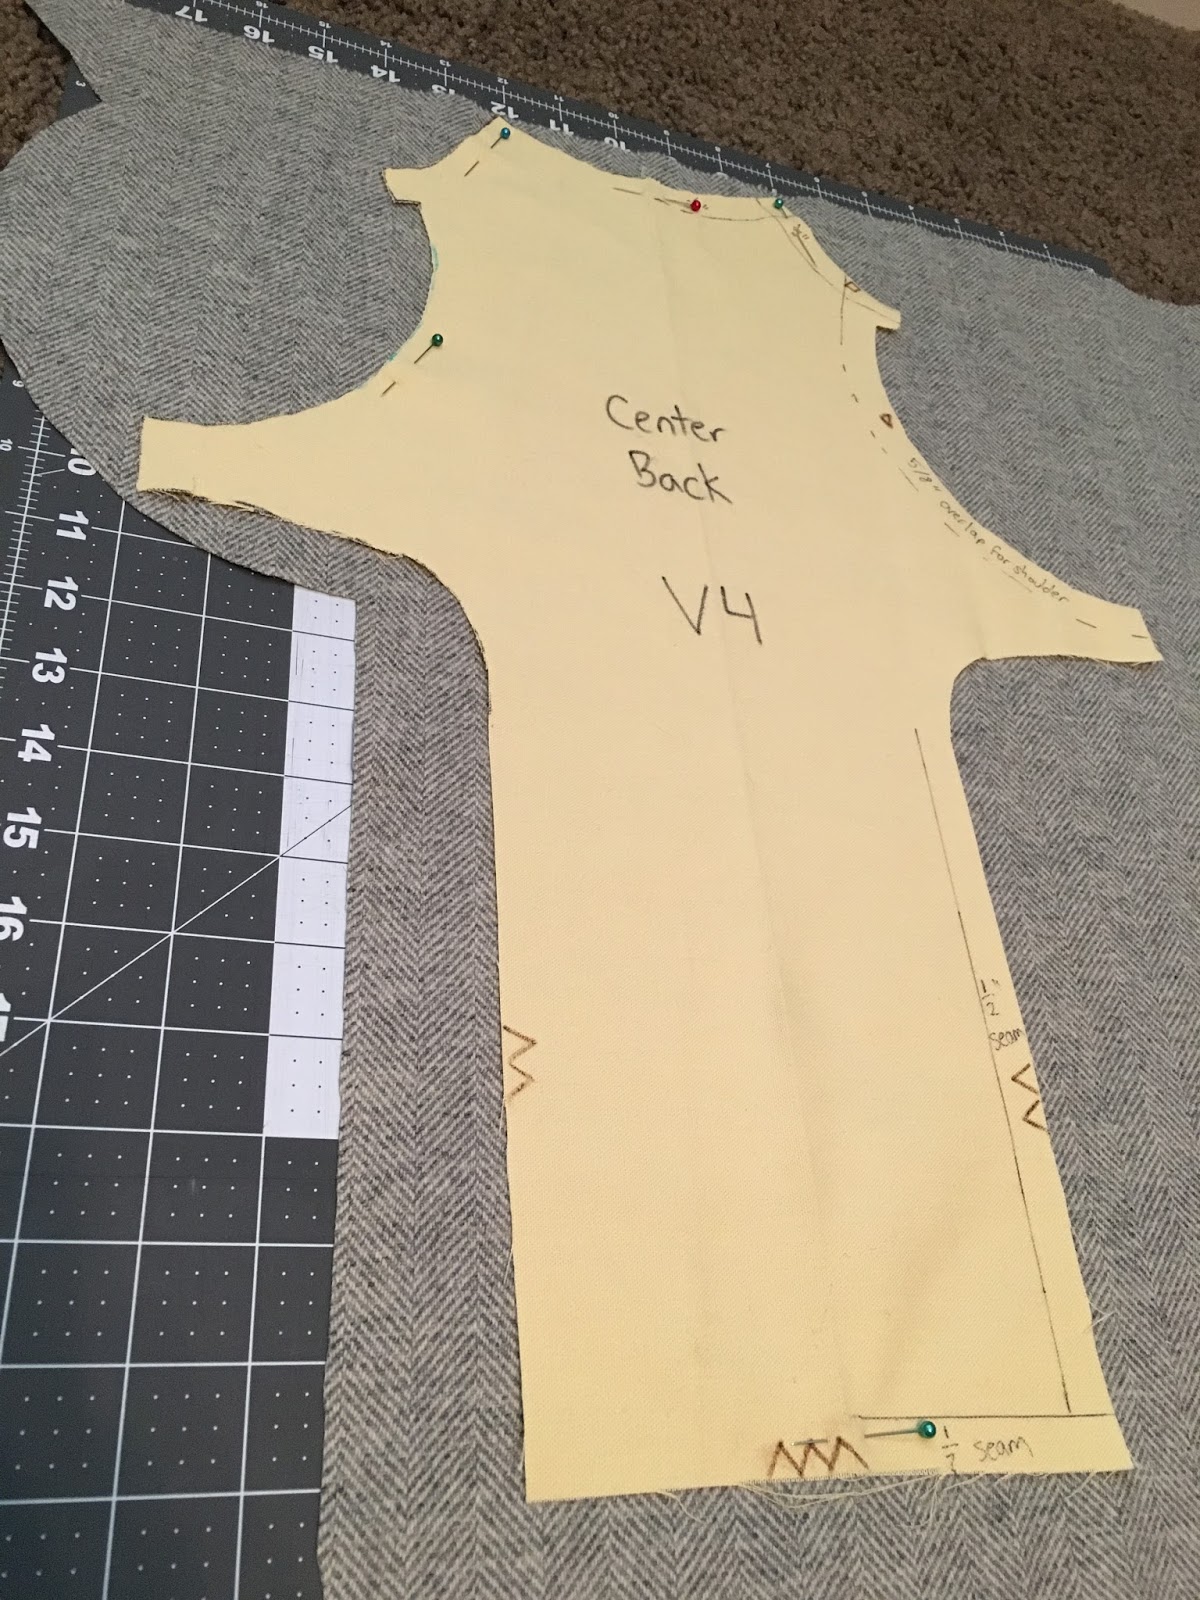
Next I cut out all the pattern pieces using EmeraldB's measurements with some slight modifications:
  • I cut 4 "Top Flap Sides" to the slightly smaller measurements of 3 1/2" x 3 3/4"
  • I combined her "Sides" into one long piece measuring 3" x 43"


I also broke off the gold hardware from the Enfield sling in order to give me as much length to play with for Rey's bag strap as possible… I’m tall. Then I tried to let my hot 110° weather help me in aging and distressing the materials: I left my pieces outside for three days! 


I mixed together some water and black acrylic paint to darken the sling and canvas backing. I used an even stronger mixture to paint the strap included with the duffle bag for Rey's bag front as well as the two small canvas loops that attach the hardware to the top and bottom of Rey's bag.

The problem with using acrylic paint to darken fabric is that it becomes pretty hard to sew through. This happened… twice:


Hardware and Paints:


Costs: 


$3.99 ** A 1" D-ring black plastic carabiner from this 6-pack
$11.00 ** A 1 1/2" metal side release parachute buckle in matte black from Amazon
$0.00 ** A 1 1/2" tri-glide silver buckle (I was lucky enough to have one in my stash)
$6.65 ** A roll pin buckle from Ebay
$7.38 ** 1 - Rub 'n Buff Metallic Silver Leaf Finish from Amazon
$4.49 ** 1 - Rust-oleum Flat Black Spray Primer


Using EmeraldB’s hardware and paint recommendation, my kids and I had some fun turning plastic into metal. 

I sprayed flat black primer onto the D-ring carabiners and then we worked together to coat all 6 of them with the Rub ‘n Buff Metallic paint. I figured one of them would have to turn out okay!


Here's how my plastic D-Ring 

compares with the original. 


Rey's bag is on the left
and mine is on the right.

I wasn’t entirely happy with the gunmetal color of the metal parachute buckle I bought so I also lightly (and purposefully unevenly) coated the buckle in the flat black primer. It made the metal look more aged and less modern than the gunmetal color did. Instead of purchasing the buckle from Amazon, I would recommend just buying a metal parachute buckle from Joann Fabrics or Hobby Lobby as I later discovered they are much cheaper there.


And here's the Parachute Buckle comparison:


Rey's is on the left
and mine is on the right.

 I really didn’t want to spend 12 bucks for a simple tri-glide silver buckle for Rey's front chest strap so I search thrift stores high and low for something that would work. Unfortunately I only found plastic buckles which I attempted to coat with the silver Rub ‘n’ Buff. I wasn’t happy with any of them and finally found a suitable buckle in my stash! My husband broke off the center prong for me (the thing that usually goes through your belt buckle holes) and I was a happy camper!

The side-by side comparison shows that Rey's buckle on the left is more rounded and shorter than mine. I found a more similar one to Rey's on Amazon but it's expensive to ship and I might have to use vinegar to remove that more modern-looking coating.

I also now realize I need to distress my Enfield strap some more to match this side-by-side... oops! I'll get right on that!

Also based on EmeraldB’s recommendation, I purchased my final roll pin buckle from Ebay. After plopping it in some vinegar to remove the gold color I felt it appeared a bit too shiny and new. I fixed this by dropped it in some very-watered down black acrylic paint to make it appear that some “dirt” had settled into the grooves of the piece.


Here's the fun side-by side!

Rey's roll pin is on the left
and mine is on the right.


The Brown Mesh Pocket:


I researched every kind of brown mesh in existence and couldn't find any with the "King Mesh" circular pattern seen in the original Rey bag.


So I made do: I searched my house high and low and found this yellow mesh bag which was in the exact measurements I needed for the pouch! I used both layers so it would be sturdy enough to realistically be a pouch on Rey's bag; This had the added benefit of allowing me to punch distressed holes and tears into the top layer only of the mesh.

Don’t stress yourself out trying to find brown mesh fabric; Just go to Joann Fabrics and get yourself a foot of whatever color they have in stock and paint it!To change the color of my mesh bag, I mixed some water with some light brown acrylic craft paint with a touch of black acrylic paint to darken it (I didn't have any dark brown paint, so I just made my own). I was worried the synthetic mesh wouldn't absorb the paint, but everything worked out perfectly!


EmeraldB recommended keeping the bag flap as a rectangle until it's attached to the bag and you can see where you'd like to cut it. I am very thankful for this suggestion as it helped me see how the bag's shape was coming along before I cut into it.

Here's a preliminary cut of the bag with my yellow chalk outlines of where I wanted to curve the top bag flap and double-layered mesh pouch. Chalk was a nice non-committal way to test out the look of things before cutting the curves.

I double-layered the top canvas flap and the small canvas flap side pieces to add some strength to the top of the bag. I then top stitched around the curved top piece to keep the flap pieces together.

Later, when I used my seam ripper to distress the bag I only cut through the top layer of these pieces. This keeps the strength of the bag in tact for all of my… missions?

Buckle Placement:


If you are like me,  you're probably trying to wrap your head around the placement of the four buckles as well as the distressing marks seen in reference images. Well, I'm not sure if my chicken scratch notes would be any help, but I'll include them anyways!

The top image shows the Back and Front sides of the bag.


And down here's the Top Piece as well as a layout for the placement of the distressed holes. 


And now... here's the final product!


I'll definitely be taking some more pictures in daylight as these came out so dark that it's hard to see what the bag really looks like!


Next up: Part 4: Rey’s Gauntlets and Arm Wraps (in progress)


Don’t miss any of these other blog posts:

Part 2: Sewing Rey's Resistance Jacket!


As I mentioned in the previous post: Part 1: Drafting Rey's Resistance Jacket, the second I saw The Force Awakens last December, I knew I must have Rey's Resistance jacket for myself!


My daughter Eowyn with our newly delivered shipment! 
After far too many hours of research, I ended up ordering my grey herringbone wool fabric from the Dorr Mill Store (Item #7910). It was expensive, so I prayed I could squeak by with only 1 yard. It was too tight of a fit for my taste, that's for sure and I truly wish I would have sprung for at least a half a yard more.

I know the fabric color is a bit light compared to the screen version but it's currently impossible to find the correct fabric online.

I also didn't want to ruin this beautiful herringbone fabric by dyeing it a darker shade. I decided to leave it as is and go with a "Lighter Rey" look! Enjoy!


Cutting out the pieces:


Between the gauntlets and the resistance jacket, I had not an ounce of fabric to spare. For this reason it was excruciatingly nerve-wracking to cut into. As you can see below, I tried to cram the back peplum directly below the center front pieces which means both pieces were directly touching each other… one misstep with the scissors and I would be in serious trouble!


Layout of the Princess Seams:

Princess seam & ladder backing


It was difficult to execute the gaps over which the ladder stitch is meant to cross as I did not have enough fabric to simply cut a large enough rectangle to cover the gap area. I thought I was a genius with my economic fabric-reducing plan of adding a 1/2 seam allowance on each side of a curved 1/4 inch window for ladder stitching (for a 1 ¼ inch strip). 


All pinned and ready to go... or so I thought.

Well, it was good in theory, but due to the bias of the curve, the thing stretched and distorted my seams, resulting in puckering. 

Here’s what it looked like after sewing the first ½” seam allowance:


See the puckering starting? Some of that is due to the curve not being clipped yet, but some is just an error I try to correct later.
Clipping the seams definitely helped, but didn't solve all of my problems. 
Below you will see the intense puckering adjacent to the shoulder blades. To create a fix for this, I ended up taking out the stitching to rework it (even though I had already clipped the seams… yikes!) and letting the unstitched fabric fall where it wanted to be. I worked on absorbing some of the extra puckering fabric into the seam allowances. 


Puckering, puckering everywhere!
Next, I needed to topstitch the princess seams leaving 1/4" channel/gap for an embroidered ladder stitching detail. In order to do this, I grabbed some 1/4" cording and pinned my fabric on either side of it. After I topstitched 1/8" away from the cord on each side, I had this glorious reveal: Perfectly spaced stitching!


Let's roll that beautiful seam-channel footage!
Drool...
I followed these instructions on how to embroider the ladder stitch on Rey's neck and back princess seams. (This was much easier than the closed blanket stitching I had to do on the jacket edges and gauntlets, I'll-tell-you-what.) I bought many different shades of gray on embroidery floss to match my light gray fabric, but finally settled on DMC #648 (Beaver Gray Light) to match my light gray fabric. Yes, Rey’s jacket is darker than mine but I didn’t feel comfortable dyeing (and DRYING) wool.
Finished ladder stitching: Each stitch was placed 1/4" apart.

 Shoulder pads of evilness:


This is what the inside of the shoulder pads look like.
First, I created this fun batting hamburger:

The top layer is the wool, followed by two high loft synthetic batting pieces and one sturdy natural cotton batting layer. The bottom layer is the lining.

I was trying to strike a balance between puffy and... not. (In retrospect, I don't really like how the low loft natural cotton made my lining layer a bit choppy rather than smooth and puffy. If I had go do this again I may have still included it, but perhaps it would have been better sandwiched between the two synthetic pieces.)

Before stitching it together I had to place the wool so the right side of the wool was the bottom layer and was actually facing the right side of the lining fabric. This is so when you flip it right side out, everything is where it should be. Below you can see the correct order in which to sew the pieces together. On the long edge I sewed only 2-3 inches from the top and from the bottom so there was a big enough gap to flip everything right side out. 

Be sure to clip your curves before flipping them right side out!
I made a cool tracing pattern to help me draw in the shoulder rows. See my Part 1 pattern drafting page for a pic that includes dimensions for each row.


My dog has since destroyed this cool template. :-/
I then hand-basted the stitches with red thread so I could then top stitch them with my sewing machine. Unfortunately that red thread was a pain in the butt to take out due to my sewing needle splitting the red stitches! 

Here's the evil red thread that I topstitched over making it nearly impossible to remove!
  Mistakes were made:

Okay, what really happened with my shoulder pads was my invisible ink disappeared by the time I wanted to sew the basting stitches. That’s an easy fix… just redraw the lines using the template, right? Well, no… the whole shoulder pad seemed to be a different shape once I flipped the thing right side out (dang puffiness!) ... so my template didn't work to redraw the stitching lines.

In order to start over, I had to use pins to space out my new rows. It was frustrating to duplicate work, but were I to make these shoulder pads again, I would have used this pin method instead of the template method. I also would have WAITED to topstitch the rows until the shoulder pads were already attached to the jacket. Yes, it's a pain to sew the topstitching once it's attached but I really think it would have prevented all the errors I encountered with my project: disappearing ink, having to take out all the stitching to extend the shoulder pad over my shoulders more (so it didn't look like I was wearing a wife-beater), shoulder pads fighting the curve of my shoulder, etc. Okay, let’s move on.

Fraying the garment:


Before I embroidered the front edges of the open-front jacket, I carefully pulled out a few fabric strands and then cut them off. I then doused the edge in Fray Check to seal it before embroidering with a closed blanket stitch.

Before fraying
After fraying!
During fraying

For the bottom edge of the garment, I added a bit of substance to the frayed wool edge by also fraying the lining. I really liked the effect of this and I imagine the original jacket may have an extra layer of more frayed wool to give it the bulk it seems to have in reference pics.


The lining:


There are lots of reasons to line your jacket:
1. Wool is itchy
2. There are lots of seams on this thing… and they aren’t going to look pretty exposed on the interior.
3. It’s realistic. What’s the point of this jacket? Certainty Rey is not trying to make a fashion statement.
4. It adds a nice weight to the garment. (See example "before" pic below)

Below is a pic showing how flimsy the jacket is without a lining. You could definitely reinforce the collar with interfacing (which I did) but it would be visible without something to cover it. Perhaps a wool self-lining would be sufficient but no one really wants wool on their neck... don't torture yourself.

Before the lining!
Below is what the interior looked like before I sewed the rest of the lining in. As you can see, I designed the jacket so the shoulder pad stitching detail would be visible form the interior of the garment (rather than extend the wool to cover this detail). 

Ugly seams everywhere!
I whipstitched the shoulder pads to the wool interior and then did so again on the wool exterior of the garment. This way I could control how puffy the edges of the shoulder pads were because without tacking them down they were a little unruly. I worked and reworked where the pads meet the outside of the jacket as it's a balance between wanting them to be 3D but not too raised off the fabric.

Unfortunately, the shoulder pads got a bit bunchy on the inside and so they didn't come out as beautiful as I intended. However, I'm still thrilled with the added weight (and softness) of the lining as a whole. Since I had to deal with the crazy look of having frayed edges all around the exterior of this jacket, I decided I wouldn't deal with an ugly interior as well! 


I knew I wanted the interior to be sexy. That means less seams and choosing a fabric soft as silk! I purchased this suede-like fabric from Joann Fabrics and I love love love it. To plan the lining, I sewed together my front mockup pieces and then cut the lining as one to eliminate the connecting seam. 

Hopefully the ruler helps you see a bit of the measurements of my garment. I have a very long torso which I think results in some problems trying to recreate Rey's jacket for my height. (I’m extremely nervous about sewing her long tunic… I mean, that thing is going to look giant with my extra 3 inches of torso.)


The lining process was a little trickier for the back. I had to actually sew together the mockup's princess seam pieces... taking into account the 1/4" ladder stitch gap. This probably amounted it a fair degree of sizing error, but it did its job. 

The entire yellow piece seen here was sewn and/or pinned together and then cut out as one large piece from the lining.

I wish I would have accounted for more than 1/2 inch of seam allowance for the lining above and below the pattern pieces as things shifted around and I was a little short in some places. Better to have more than not enough!

You can see here that I whipstitched the shoulder pads again once I got the rest of the lining in place; this way the shoulder pads and the jacket lining would be connected. A bit of overkill, you could say: I’m prepared for a Bantha to try to rip off my shoulder pads.

You can also see the thick white non-fusible interfacing I slipped in to add strength to the collar. I was afraid the bottom ending point of the interfacing would be noticeable as a ridge from the outside of the garment so I chose not to use an iron-on facing. In this pic the interfacing is moving around a bit, but you get the idea!

Since the lining is essentially held in pace by the embroidery, I had to hand-baste the lining in along all seams. This way the lining was completely flush with the wool all the way to the edges and all the seams pointed in the directions I intended them to. In the pic that showed the interior of the garment prior to adding a lining you could see I pressed all interior seams open EXCEPT for the back peplum (due to all the added bulk of the princess seams/ladder stitching channel). 


I left the bottom of the lining unfinished (and purposefully frayed) in order to add some bulk to the frayed wool. However, since I cut the bottom of the lining in the car on a road trip, I may have miscalculated the length of the wool and had to add a second layer of frayed lining to actually meet the edge of the wool. Don’t knock it though, I absolutely love the look of it! See the two rows of frayed lining in the pic below? Such a cool effect, I think. I mean, if Rey sewed her Resistance bag *nervous tick* INSIDE OUT (with fraying EVERYWHERE *nervous tick*) she couldn’t be the best seamstress in the world, could she? 


Check out how structured the jacket is without being on a dress form! It's a solid item, to be sure.

After basting along all seams then folding over and pinning the lining to the front and top edges of the jacket, I was ready to embroider it into what you see pictured here! 


Embroidery:


Rey's jacket uses an embroidered closed-blanket stitch around the front edges and collar. I used this tutorial to help me learn how to do this. Luckily I had practiced on Rey's gauntlets first so I got the hang of it, but embroidery is still not my favorite thing. The stitch is supposed to look the same on both sides of the garment... but it’s somehow missing the top embroidered bar on my lining interior. I'm sure I'm doing something wrong, but all I got are "V" shaped stitches on the inside. Nevertheless I like it!


I left the collar unfinished even though it appears that it would be more screen-accurate to have a properly finished edge (possibly to hide the interfacing). Unfortunately I had a few mess-ups that resulted in my collar being too low and I didn't want to sacrifice any more height by folding over the edge. Therefore, I did not fray the collar before embroidering it.


And now... the finished garment:


Next up: Part 3: Sewing Rey’s Resistance Bag
(preview pics below!)